Ok, so to celebrate the new shows on FoodNetwork, A Cowboys Wife is having a giveaway! I know *I* love giveaways, especially those centered around food or cooking or both. So, you HAVE to go over there and celebrate with her. You just have to. Go ahead, I’ll meet you there.
Saturday, August 16, 2008
Oven Roasted Veggies
I’ve started eating like an adult instead of a 12 yr old, and with the help of my Tweightloss friends, I hope to start losing some of this post-baby, post-surgery weight I’ve put on. And maybe some more. Here's what I made the other night, along with a grilled chicken breast. It was DELICIOUS.
Also, it's my entry for this week's Photohunter theme, "Colorful".

- 1 lg. italian pepper
- 1 red onion
- 1 red pepper
- 1 yellow squash
- 2 tbsp low-fat salad dressing
Spread the salad dressing over the foil line baking sheet. Spread veggies out in a single layer. Bake for 30 minutes on 400°. Serves 2.
Thursday, July 31, 2008
Steak & Summer Veggie Stir-fry
Sorry folks, I know I could come up with some sort of name for this, but it’s been a really long day and I just wanna post it before I forget to share it with you.
Steak & Veggie Stir-fry
1 fair-to-middlin sized zucchini, washed well (not peeled)
1/2 lg onion, sliced thin (not paper thin though)
1 Tbs. butter
1 cheapo steak, cut into 1/2 inch or smaller strips (I used bottom round)
garlic salt
tomatoes – 1 lrg fresh tomato or more if you really like tomatoes :)
pasta of your choice – I used spaghetti because I was out of angel hair
So, I had some leftover oven roasted tomatoes I’d made earlier this week so I used those but you could use some nice fresh ones too. Also, if you use fresh, throw in a clove or 4 of garlic, sliced thin.
- 1. Melt butter in skillet. Toss in onions and let them begin to sweat while you’re slicing the zucchini into the pan as well. Cover and let them steam/sweat for a few minutes. Do not slice the zucchini TOO thin or it’ll fall apart, and this dish is much better when you can bite INTO the zucchini.
- 2. While the veggies are cooking, slice up your steak. Also, put on a pot of water to boil for your pasta.
- When veggies are tender (don’t let them get mushy), remove from skillet to a plate. Add pasta to boiling water.
- 3. Place steak strips in same pan, and sprinkle with your garlic salt or other seasoning of choice. I used McCormick’s Pepper & onion seasoning. It’s my new favorite :)
- 4. Simmer steak strips, turning once and being careful not to overcook. Once pasta is cooked, add veggies back to pan, then add drained pasta to skillet as well – toss gently and serve.
You might also sprinkle some parmesan over the top if you are so inclined. As well, some nice bread would finish this off perfectly!
I’ve also enjoyed this with chicken instead of beef. As well, I’ve enjoyed it without meat – but I prefer meat in everything!
Enjoy!
Tuesday, July 22, 2008
Yummy for you
I will admit that this post is WAY late, but hey, better late than never!
I found the MOST amazing recipes just before the 4th of July holiday weekend, and decided to try them all. Here are my results, and of course, PLEASE visit the original sites to see their other amazing recipes as well :)
First up was this wonderfully fresh, wonderfully easy cucumber & tomato salad. It literally took me just minutes to put together, and it was SO delicious!

Now, of course, I did not know it was going to come out good enough to blog so I didn’t take pictures along the way LOL Isn’t that always the way?
Anyway, I originally found this recipe over at My Wooden Spoon but modified somewhat, so I thought I'd give you the modified recipe, and of course, a link to her recipe as well :)
Tomato & Cucumber Salad
First off, I halved the recipe because I'm the only one who likes this stuff so if you have a buncha folks who would like it, be sure to double :)
- 2 medium tomatoes quartered & then eighth'd?
- 1 medium cucumbers, sliced
- 1 onions, sliced and separated into rings
- 2 Tbsp. Vinegar (I used white)
- 1/4 c. Oil, I used Olive Oil (I believe I used canola, as I had no olive)
- 2 Tbsp. Sugar
- 1 tsp. salt
- 1/2 tsp. black pepper
- 2 tsp. minced parsley - although I used some fresh basil and dill out of my garden, along with some dried parsley I had in a jar.
First, slice, chop & dice to your heart's content. I left the tomatoes kind of big because in the past, my tomato salads wind up being mush. I don't like mushy tomatoes - so I went with bigger quarters. In a separate bowl, I whisked the vinegar, oil, sugar (making sure the sugar dissolved), and I left the salt & pepper for last.
Finally, I gently folded everything together with the dressing, put it in a sealed container in the fridge for about 2 hours or so and served it with lunch (recipes forthcoming) :) IT was AWESOME! Even my daughter ate some!
 By the way, speaking of the Wooden Spoon! She’s got a FABULOUS giveaway going on now through the end of July (next week!). She’s giving away 2 NIIIIICE knives - go over and check it out!
Tuesday, June 03, 2008
Turkey Mac & Double Cheddar
Do you ever have something in mind planned for dinner and then when you go to make it, find you don't have a key ingredient? That's what happened to me this evening. I'd planned on making the low-carb Mexican casserole for my family for dinner. At 4pm, which is normally when I go down to make dinner, I found I had no taco seasoning.
Now of course, I could have scanned the Internet for a solution, but nahhhh, I sat and sulked on twitter for a few minutes. Then I went back downstairs to figure out what else I could make.
I had a jar of Ragu Double Cheddar cheese sauce that I'd had forever. I looked at the back and found a recipe that sounded pretty good - at least, I figured, the kids would probably like it. The problem was, I had ground turkey already defrosted, and no time to defrost hamburger, so I was going to have to substitute the turkey for the burger it called for. Eh, who cares, really - I was going to have a salad with some leftover chicken in it from last night's dinner (heh). What I wound up making, with some of my own tweaks, came out SO GOOD, I didn't have my salad, I had what I'd made for them! LOL
Here's what you'll need:
- 1 lb (or more) ground turkey (7%) - browned and drained
- 3-1/2 cups water (I wound up using closer to 4 cups)
- 2 cups uncooked elbow macaroni
- 1 jar Ragu® Cheesey Double Cheddar Sauce
- 1/2 - 1 cup sweet peas
- 2-3 tsp (or Tbls)
 Brown the ground turkey in a skillet. Drain the grease (I know - there isn't alot) and set turkey aside. In same pan, bring the water to a boil. Add pasta and cook for 6 minutes or until tender. (Mine took closer to 10 minutes and I had to add water to it.) Do not drain pasta. Return ground turkey to the pan, add in sauce. This is when I also threw in the sweet peas. Blend it all up and heat through. |
 When I'd dished it up, I spotted the McCormick Smoky Sweet Pepper Seasoning. I sprinkled it over the pasta & turkey and let it sit for a few minutes or so, to help it dissolve/blend. Oh MAN did that make a difference! It really was awesome. |
|
|

Shrimp & spinach w/angel hair
I literally threw this recipe together this weekend. It was delicious!
- 2 c. fresh baby spinach
- 3 cloves garlic, crushed
- 1/4 c. oven roasted tomatoes (recipe below)
- 12 large shrimp
- 4 oz. angel hair spaghetti
Using the oil from the roasted tomatoes, brown the garlic. Once the garlic is fragrant, add the spinach and begin to wilt it. After the spinach has wilted, add in the tomatoes. Allow the juices from the tomatoes coat the pan, and then add the shrimp. If you’ve bought pre-cooked shrimp, just heat them up and toss with tomatoes & spinach. Otherwise, cook until the shrimp have turned pink.
When pasta is finished, drain and add pasta to pan and coat. Serves 2.
Oven Roasted Tomatoes:
To roast the tomatoes, I had about 6 tomatoes that were ready to turn. I coated a cookie sheet with a few tablespoons of olive oil. I cut the tomatoes into 6ths (making sure they were about 1/2” at the most) and spread them out on the cookie sheet. I drizzled some more olive oil on them, sprinkled with Italian seasoning and garlic salt. I baked them at 300 degrees for about 90 minutes or so, then shut the oven off and left them in there most of the day. They were EXCELLENT alone, but also perfect for the shrimp thing. :)

Monday, May 19, 2008
Garlic Chicken w/sweet roasted pepper sauce
I've been cooking up all sorts of yummy new meals, and decided I just had to take some time and actually post them!
This recipe comes from a new sort of program that Shaw's Supermarkets has going on with America's Test Kitchens - they provide the recipe cards, free - and of course, you buy the ingredients (cute how that works huh?). In any case, that's where this recipe comes from!
Garlic Chicken w/Sweet Roasted Pepper Sauce
- 4 boneless, skinless chicken breasts
- salt & pepper
- 2 Tbls. vegetable oil
- 1 sm. onion, sliced thin
- 6 garlic cloves, sliced thin
- 1 12oz. jar roasted red peppers, drained & chopped
- 2 tsp. sugar
- 1-1/2 c. low-sodium chicken broth
- 1/4 c. fresh basil, chopped
- 2 Tbls. unsalted butter
In my photo, you'll see more than 4 chicken breasts because the ones I had were really big, so I cut them in half to cut down on cooking time.
 Pat chicken breasts dry and season with salt & pepper. Heat oil in large skillet over medium-high heat. Cook chicken until golden brown, about 5 minutes per side. Transfer to plate.
 Add onions to fat in the skillet and cook until lightly browned, about 3 minutes. Stir in garlic and cook until fragrant, about 1 minute.

Add peppers, sugar, broth & browned chicken, along with any accumulated juices and bring to a boil. Reduce heat to medium and simmer until chicken is cooked through, about 5 minutes (make sure your chicken is 160°F please!)
Transfer chicken to serving platter and tent with foil. Return skillet to high heat and simmer until sauce is slightly thickened, about 5 minutes. Off heat, whisk in basil and butter. Season with salt and pepper. Pour sauce over chicken & serve.

It really was as good as it looks! It was very quick to make (their whole series is 30 minutes or less recipes) and I'll definitely make it again!
Wednesday, May 07, 2008
Ratatouille - no, not the movie!
LOL My kids & I just saw the movie Ratatouille last week and they were intrigued but the idea of the FOOD ratatouille. But I KNOW that my oldest does not LIKE most vegetables - my daughter will, on occasion, depending on her mood, either love them or hate them. BUT I LOVE THEM. So I figured I'd make it and cash in on the popularity of the movie.
I looked around the net for an interesting recipe - there's so many variations. I wound up making my own because I wasn't paying attention LOL It came out SCRUMPTIOUS and my kids RAVED over it. My oldest, mr. only likes green beans, asked for 2nds... and 3rds!

- 1 medium sized eggplant, peeled and cut into approx. 1" chunks. (I didn't seed it either)
- 2 medium sized zucchini (not peeled), sliced
- 1 medium sized yellow squash (not peeled), sliced
- 3 stalks celery, chopped
- 1 medium onion, chopped
- 2 green peppers, seeded and chopped (but left in good sized chunks)
- 1 14 oz can tomatoes (with onions)
- 1 beefsteak tomato, quartered and eighth'd? LOL
- 1 tbls. olive oil
- 3 large cloves garlic, sliced
In a pot, I sauteed the onions and garlic. Once the onions were transluscent, I added the green peppers - covered the pot and let them cook down some. To that, I added the eggplant & tomatoes and then simmered it, covered, for about 15 minutes - or perhaps 20. Finally, I threw in the celery & squashes. Again, I covered it and let it simmer while I cooked up a pound of angel hair spaghetti, which I served the ratatouille over. Truly, this was a delicious meal! It did need some salt, but we added that individually - and it was even better when we added parmesan cheese. All in all, a BIG success in my house!
Enjoy!
Tuesday, May 06, 2008
How time flies!
Wow - this blog is going to be 3 years old in a couple of weeks! Woohoo! I'm trying to come up with a way to celebrate. Have any ideas? Let me know!
Wednesday, April 09, 2008
Crockpot Cooking at it's finest
I was feeling pretty uninspired this morning when I was digging around in the new chest freezer we'd bought last month. I know that in order to keep the food from getting freezer burned, I must use it! So I reached to the bottom and pulled out a family sized package of chicken thighs. Hmm... what to do with them? Again, completely uninspired, I ran them under some hot water just long enough so I could whack them on the sink to break them into 2 chunks small enough to fit into the crock pot. I sprinkled onion salt and garlic powder liberally, then I opened a 28oz can of diced tomatoes and poured that on top. I covered it and turned it up to high.
Around noontime, I was looking in the regular freezer and came across some sliced zucchini I'd made before our vacation - to be honest, I can't even really remember how I cooked it - it may have been in Italian dressing, but one can't be too sure. Eh, that's ok - I tossed the frozen lump of zucchini into the crock pot as well. About an hour later, it was defrosted enough for me to stir the whole thing up, making sure the zucchini got covered up in tomato'ey goodness. The aroma in my house is Soooooo Goooood!
In about an hour, I'll go back to the kitchen and stir things up again and also put on a pot of water to boil. I'll make some sort of pasta (not really sure what I have at the moment) and poof - dinner will be done! The zucchini is very thinly sliced, so I'm betting it'll fall apart nicely - because my kids don't purposely EAT zucchini, this is a good thing that it falls apart :)

Now, for those of you who aren't too thrilled with chicken thighs, this recipe could easily be accomplished with any other cut of the chicken, just adjust your cooking times for boneless!
Also - if you'd like the chicken to be browned, you could brown it in the frying pan before or spoon the whole thing into a casserole dish when it's done and throw it under the broiler. Me? I don't mind albino chicken!
Enjoy!
To recap:
10-12 chicken thighs (frozen)
1 28oz can diced tomatoes w/juices
garlic powder
onion salt
sliced zucchini
Yum!
Technorati Tags: cooking,recipes,chicken recipes,chicken,zucchini,crock pot recipes,easy recipes,cooking blogs
Thursday, November 01, 2007
Tilapia Croquettes
Ooooh, these were so yummy, hubby requested that I make them again SOON and make MORE. LOL And it's so easy and fast to make! 20 minutes to prepare and maybe 20 minutes to cook!
Sorry for the lousy pictures though. LOL
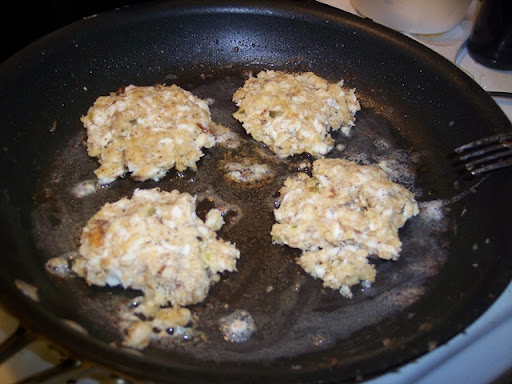
This was the first time I made them in the butter the recipe calls for. The butter burned.

This was the 2nd time I made them, this time i cooked them in olive oil - I suggest the olive oil :)
Ingredients
* Pickle Relish, 1/3 cup
* Kraft Mayo Light Mayonnaise , 2/3 c
* Lime Juice, 1 lime yields
* Tilapia filet, 16 oz (I'm sure this recipe would work with any flaky fish)
* Bread crumbs, dry, grated, plain, 1.25 cup
* Egg, fresh, 1 large, lightly beaten
* Garlic, 3 cloves
* Butter, unsalted, .25 cup
* 1 tsp lime peel
* 2 tsp. lemon pepper seasoning
Directions
Stir together mayo & relish to make tartar sauce. Add lime juice and lime peel.
Coat lg skillet with 2 tbs of butter. Cook fish fillets for 5 minutes on each side, or until fish flakes. Flake fish fillets and place in large bowl. Add 1/3 c. tartar sauce mixture, breadcrumbs, egg, garlic and lemon pepper. Shape into 6 patties.
*I actually made 12 patties with this much mixture - I just didn't make them real THICK.
Cook patties in batches in remaining 2 tbls butter over medium high heat 5 minutes on each side or until golden brown. Serve immediately with remaining tartar sauce if desired.
Number of Servings: 6

Your manuscript is both good and original, but the part that is good is not original and the part that is original is not good. - Samuel Johnson
Nutritional Info
- Servings Per Recipe: 6
- Amount Per Serving
- Calories: 354.4
- Total Fat: 20.3 g
- Cholesterol: 103.3 mg
- Sodium: 541.8 mg
- Total Carbs: 24.2 g
- Dietary Fiber: 1.2 g
- Protein: 18.5 g
Wednesday, October 17, 2007
Baked, Stuffed Acorn Squash
As a kid, the only time we really ate squash was at Thanksgiving & Christmas - and it was boiled butternut squash that was then mashed and buttered. It was yummy. However, a few years ago, thanks to our local farmer's market, I became enamored with other kinds of squash as well as different ways to prepare them that didn't involve watering them down by boiling them. This is one I came up with.
Acorn squash is full of good stuff, too!
2 acorn squash, approximately 1 lb each
1 package bulk sausage meat, the kind you use for stuffing (or to make sausage patties for you down there in the south)
Onion powder
garlic salt
Split the acorn squash lengthwise - this allows them to stand upright
Remove the seeds & other icky stuff inside
squeeze out 1/4 of the sausage meat right into the squash cavity
sprinkle with garlic & onion & whatever other spices you might like
cover with aluminum foil
bake in a 350-375° oven for 1-1/2 hours
Makes 4 servings. Obviously, if you have more people, cook more squash LOL
Serve :)
Thursday, September 13, 2007
OMG This is so good Apple Pie

We went apple picking this past weekend and now are the proud owners of WAY TOO MANY APPLES! Since the only varieties that were available to pick were Macs and Cortlands, that's what we have. Of course, they are crying out to be made into any kind of apple-y goodness I can think of so I went on the hunt for a good, easy apple pie recipe. I adapted several recipes that I found on the net and made it my own way and it came out simply FABULOUS. Please excuse my messy counter - I have a habit of starting things without thinking ahead LOL
You will need:
- 7 Macintosh apples or other similarly tart apple
- 1/2 c. granulated sugar
- 1/2 c. brown sugar
- 2 Tbls. butter
- 2 Tbls. flour
- 1 tsp lemon juice
- 1/2 tsp. salt
- 1/2 tsp. cinnamon
- 1 Ready-to-use pie crust (the kind you unfold)
Next, I cored the apples (didn't peel them), and then cut them into quarters, and then eighths. In a separate bowl, we combined flour, sugars, cinnamon and salt and mixed.


Next, we layered the apples into the pie dish, being careful because it's hot now. After each layer, we'd sprinkle a GENEROUS helping of the sugar mixture, until we'd used up all the apples.

Then we cut the butter up into small chunks and placed it around the apples.

Next, we placed the top crust on to the pie, pinching the pie crust closed along the edges. We cut a couple of ventilation holes on top and then rimmed the edge of the crust with aluminum foil to prevent it from burning. I also swiped a bit more butter on the crust to help it brown. I'd suggest milk, though.
 Into the 375 degree oven (on a cookie sheet to prevent messy, burning spills).
I baked ours from
 to
to
So, roughly 40 minutes. Essentially, you just want to make sure the apples are done.
 The finished product. So you're saying "Ok, but you said this is CARAMEL apple pie - where's the caramel, Dawn?"
I'm not a big fan of caramel but hubby is and I do love to make him happy, so I dug this out of the fridge:
 Scooped some out into a microwave safe measuring cup and microwaved it for 30 seconds.
Then I brushed it on:

Voila!

A generous portion of french vanilla on top, sprinkled a little cinnamon on and OMG This is SO GOOD Apple Pie!
Subscribe to:
Posts (Atom)